![]() |
| Neon Pink bubble tip anemone (left) |
Topics on Reef, Saltwater, or Fish only Aquarium Keeping, Fish Breeding, Coral Propagating, Fragging, and Trading.
2014年11月30日 星期日
20141130 Colored Bubble Tip Anenome
I have purchased this colored bubble tip anemone during the Aquatic experience in Chicago a few weeks ago. It has now successfully acclimated to the 180 and is doing well.
And also an update on one of the corners of the 180 Gallon tank.
2014年11月25日 星期二
20141126 180 Gallon Reef Ready Tank Build part 5
Now all the livestocks in!
I am spreading all three clams into three corners. Built two mounts of rock work to hide the overflow columns. And the wave maker hides perfectly in the corner.
20141125 180 Reef Ready Tank Build part 4
The LED light arrived and installed. All the plumbing are also in place. The cloudy crust on the front glass is just salt crystal when the tank was laying on its side waiting for the paint to dry.
I will be using two Mag 7 as return pumps, and also 2X 200W heaters. I have learned from experience to have 2X of these as a preventative measure in case one of them fails, I would still have one working. The general rule is to have multiple mechanisms that are considered "lifeline" for your tank, such as pump, heater, etc.
2014年11月24日 星期一
20141124 180 Gallon Reef Ready Tank Build Part 3
I spent day 1 of my vacation in the garage building the canopy frame. This was made of .5X2 and .5X1 wood. All I have to say is it's not easy doing the whole thing with one person and sub-par tools
The frame fits well over the tank. I plan to hang 3X 150W LED lights.
2014年11月20日 星期四
20141120 180 Gallon Reef Ready tank build
While waiting for the 180 gallon tank's paint to dry, I took the opportunity to also paint the back panel of the stand and the back of the 75 gallon tank, which I will be placing underneath the 180 as a sump.
I am experimenting a "compartment free" sump, where the water is allowed to flow freely through without needing to flow through compartments. But I am building a media container within the sump and also act a as divider for any rock, macro algae, and possible livestock I place down here from the skimmer and the return pumps.
![]() |
| Tank Stand upright while the paint dries |
![]() |
| open divider for the sump |
2014年11月18日 星期二
20141118 180 Gallon Reef Ready Tank Build part 1
I had the opportunity to obtain a briefly used 180 Gallon Reef Ready tank with built stand from a friend. I will be putting together a series of this build. First of all, if you are looking to obtain a tank of this size, please be sure to have enough muscle help- the tank weights 330b dry. I actually had to go on craigslist to find a couple big boys from a moving company to help me move this, especially to bring it down the stairs! The tank is measured 6' X 2' X 2' so you should also make sure whatever room you want to put it into will either be a straight shot or have enough room for turning, not to mention taking doors out, etc.
I purchased a 75 gallon tank to use as sump ( you can see in the photo below). So the estimated total water volume would be around 230 gallon. The first thing I had to do is to paint the back of the tank. Although painting is unnecessary, I find it less distracting to have the back of tank be in a darker, solid color than seeing the wall and the wires hanging behind. After the tank is painted, I left it on the spot to dry for 3 days.
In the meanwhile, I also install the bulkhead for the overflow onto the tank while it's on its side. Because drying to install the bulk head upside down when the tank is already on the stand will be a much tougher job.
![]() |
| Painting back of tank, to preserve paint, I used masking tape to mask out the overflow sections |
In the meanwhile, I also install the bulkhead for the overflow onto the tank while it's on its side. Because drying to install the bulk head upside down when the tank is already on the stand will be a much tougher job.
![]() |
| See the 75 Gallon sits perfectly under the 180 Gallon stand. |
2014年11月11日 星期二
20141111 Driftwood for Fishtank
I attended the Aquatic Experience last weekend in Chicago to meet some of the leading aquarium industry venders as well as some local retailers. I will go through some of the highlights with each separate post. I know I seldom talk about freshwater so I feel like I owe this one.
So what is Drift wood?- Driftwood is mostly collected near water- ocean, river, or lake. These are mostly tree roots that have grown around rocks to form the unique shapes and curves you see. They are mostly dead trees that have been toppled and gets washed down by storm flood.
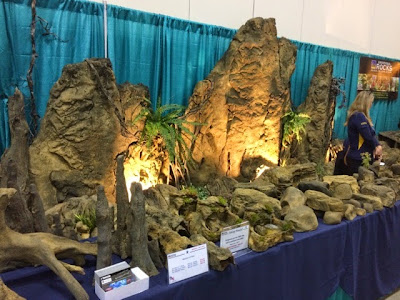
So why drift wood? Do you go with natural or artificial? What kind of tank are driftwood suitable for?
To answer that question, I will break down some of the common functions of driftwood.
1) Decoration- similar to rock, drift wood help create landscaping dynamic in the tank
2) Structure- driftwood provide places for plants to root and grab onto
3) Food- Believe it or not, many fish, including many pleco species actually use driftwood as part of their diet.
4) Nutrition- When soaked in water, driftwood would slowly decay and release the nutrition, minerals into the water.
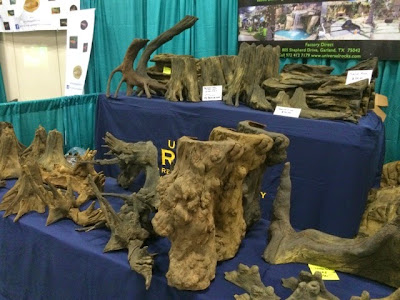
What about artificial drift wood? The pro of artificial driftwood is they are light (mostly plastic), can be cheaper, and doesn't "color" the water like real drift woods would.
The con is they serve only function #1 & 2 as describe above but not 3 or 4.
Since real drift woods are collected from dead trees, it is not harmful to the environment in a direct way. Though if too much driftwoods are collected from the water body, organisms that relay drift/rotten wood to thrive and breed may face some challenges.
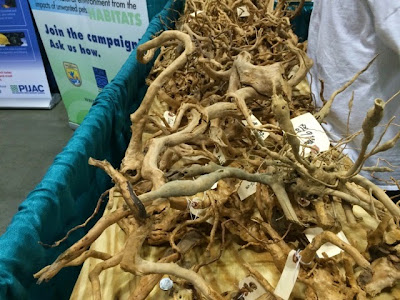
So what is Drift wood?- Driftwood is mostly collected near water- ocean, river, or lake. These are mostly tree roots that have grown around rocks to form the unique shapes and curves you see. They are mostly dead trees that have been toppled and gets washed down by storm flood.
![]() |
| Driftwood vender- some jumbo pieces |
To answer that question, I will break down some of the common functions of driftwood.
1) Decoration- similar to rock, drift wood help create landscaping dynamic in the tank
2) Structure- driftwood provide places for plants to root and grab onto
3) Food- Believe it or not, many fish, including many pleco species actually use driftwood as part of their diet.
4) Nutrition- When soaked in water, driftwood would slowly decay and release the nutrition, minerals into the water.
![]() |
| Driftwood Vender- Tree Trunks |
The con is they serve only function #1 & 2 as describe above but not 3 or 4.
Since real drift woods are collected from dead trees, it is not harmful to the environment in a direct way. Though if too much driftwoods are collected from the water body, organisms that relay drift/rotten wood to thrive and breed may face some challenges.
![]() |
| Driftwood Vender- Roots |
訂閱:
文章 (Atom)


